Tag Archives: Spring 2023

ILLUSTRATOR WEEK 2, DAY 2 – LIVE TRACE / LIVE PAINT

Objective:

Students will be able to use Live Trace and Live Paint to color hand-drawn artwork that was converted to digital artwork using a scanner so that they can more easily apply color to their hand-drawn or digitally produced art.

Video Links:
https://helpx.adobe.com/illustrator/how-to/illustrator-auto-tracing-and-resolution.html?set=illustrator–fundamentals–trace-artwork

https://helpx.adobe.com/illustrator/how-to/illustrator-live-paint.html?set=illustrator–fundamentals–apply-color

Topics Discussed:

  • File > Place
  • Live Trace
  • Live Paint
  • Gap Options
  • Swatches Panel
  • Adjusting settings in the New Document dialog box.
  • Establishing multiple artboards.

Assignment:

Create a new artboard in our current document to complete this activity.

Follow along with the in-class tutorial to learn a new method for converting imported raster graphics to vector graphics called Live Trace, as well as a technique for recoloring vector graphics called Live Paint.

  1. After you have watched the tutorial, import the Robot Sketch 01.psd file below on to your first artboard using File > Place.
  2. Follow the steps in the tutorial to apply Live Trace to the artwork (converting it to vector graphics).
  3. Next, follow the steps in the tutorial to activate Live Paint, and use Live Paint to color in the robot.
  4. DO NOT use the Paint Brush, the Blob Brush or any other drawing tool to color in the robot. Use Live Paint only.
  5. Be sure to pay attention to the Gap Options mentioned in the tutorial, so your Live Paint doesn’t bleed out all over your artboard.
  6. When the second robot is successfully colored in, save your document. Confirm that you have both the hand-traced and Live Traced artboards complete, and turn it in to today’s assignment post on our Google Classroom page.

Sample Image File Link:
Robot Sketch 01.psd

Assigned: February 2nd, 2023
Teacher Pacing Due Date: February 3rd, 2023

ILLUSTRATOR WEEK 1 – DAY 4: THE PEN TOOL

Objective:

Students will be able create and modify paths and shapes by using the Pen Tool in Illustrator so they can begin to master the powerful capabilities of this versatile tool.

Video Link:

https://helpx.adobe.com/illustrator/how-to/new-pen-tool.html?set=illustrator–fundamentals–create-artwork

Activity Link:

The Bézier Game

Topics Discussed:

  • Pen tool
  • Modify anchor points and handles
  • Convert corner points
  • Smooth curves at anchor points.

Assignment:

Click the Activity Link to play the Pen Tool Game! Follow the tutorial, and practice using the Pen Tool to produce shapes with Bézier curves! There are ten levels (not including the tutorial levels). Take a screencap (Command+Shift+4 and draw a rectangle around the part of the screen you want to capture) of your highest level completed and place it on the lower left artboard. The first to complete all ten levels each class gets a prize!

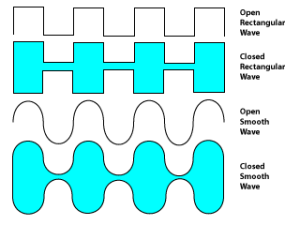
Once you’re comfortable with the pen tool, demonstrate the usage of the Pen tool on the lower right artboard by drawing an open rectangular wave, a closed rectangular wave shape, an open smooth wave and a closed smooth wave shape. Apply a colored fill to the closed waves. When you are finished, it should look something like this:

Illustrator Example Week 1 Artboard 4

Save the file. Make sure you have all of the required activities from this week on each of the four artboards, and turn this entire document in to the “Illustrator Week 1” assignment post on our Google Classroom page by the end of the day on Friday.

Assigned: January 17th, 2023
Teacher Pacing Due Date: January 18th, 2023